
How to Get Muxy Gateway Setup
- Amanda Scharber
- May 15, 2023
- 4 min read
Updated: Jun 13, 2023

We’re going to cover what you need to do to get Gateway added into your game. Once you’ve completed these steps, you’ll be able to: add actions, create polls, display game data, and test that your extension is working!
Here are the steps:
Setup Extension Configuration
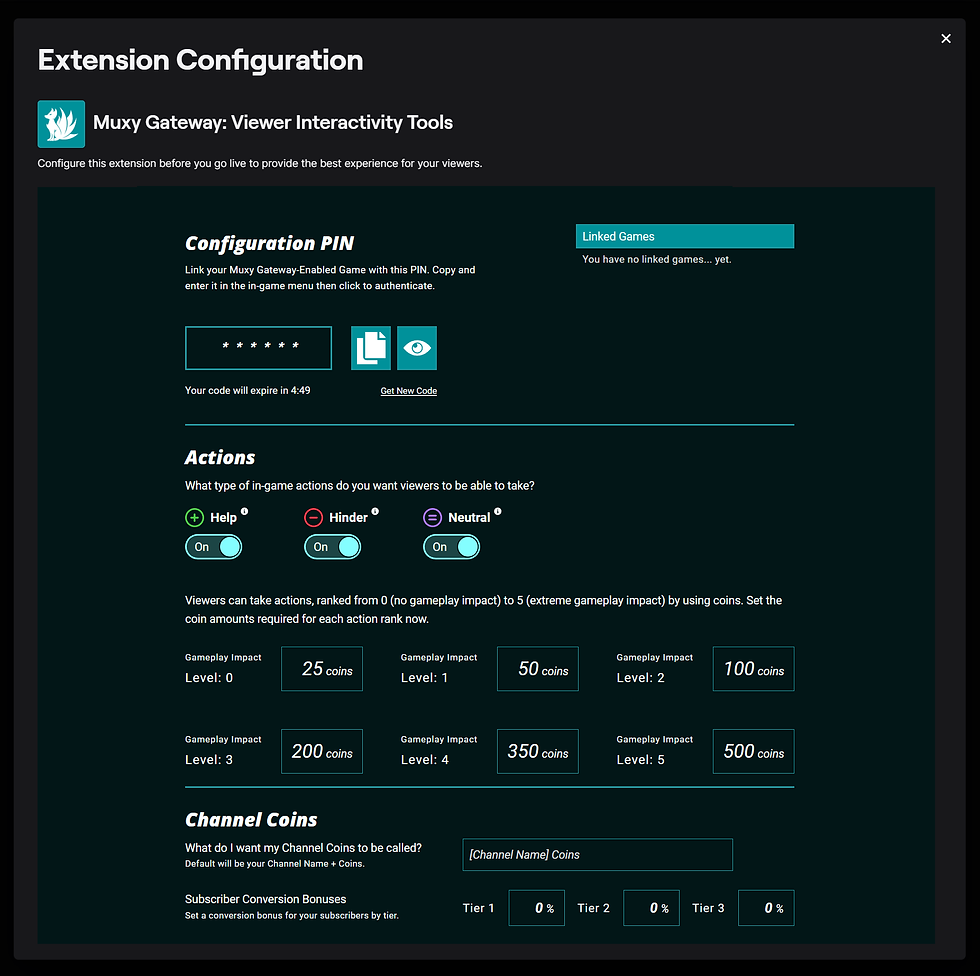
Gateways setup flow is very simple. A streamer will add the Gateway extension to their Twitch channel, and from the configuration page of the extension they will receive a PIN that they enter into your game to authenticate themselves. From there viewers can start interacting with your game!
Login to Twitch and go to the Extensions tab in your Creator Dashboard
Search for "Muxy Gateway" and click Add
To get the PIN used for authentication, click Configure on the Muxy Gateway extension
This PIN is then entered in-game to pair the extension to the game
It's as simple as that! So streamers know the Gateway extension is available for your game, you will want to add a link in-game, on your game website, and anywhere else they may be able to discover the availability. Similarly, you will need to create some in-game UI for the extension pairing. Streamers will need a field to enter in and authenticate their PIN from the extension config. Learn more about that at our blog here. You will want to add the extension to your channel for testing as well to ensure that everything is appearing and working correctly.
In the Gateway Extension config, streamers can get their unique authentication PIN, see what games they’ve paired, turn on or off action types, configure how many Coins each Action requires on a 0 to 5 scale, rename their channel coins, and set up conversion bonuses for Sub Tiers.
Setup Game Library
First, you must install Gateway from https://github.com/muxy/gateway-unity. If you're unfamiliar with how to install a package, see the Unity manual here https://docs.unity.cn/ru/2021.1/Manual/upm-ui-giturl.html
Once you have Gateway in your project, you will need to set up an entity to access the Gateway SDK.
Create an entity and add a new component with the following script:
C#
using System.Collections;
using System.Collections.Generic;
using UnityEngine;
using MuxyGateway;


public SDK SDK;
public String GameID;
public bool Production;


void Start()
{
    SDK = new(GameID);
    if (Production)
    {
        SDK.RunInProduction();
    }
    else
    {
        SDK.RunInSandbox();
    }
}


public void Update()
{
    SDK.Update();
}
For the sake of this guide, we will assume all of the examples given for each feature will go inside this script we've just made. The important thing is that you have a way to access the SDK, do whatever works best for your project.
Authentication
After SDK setup, the next step is authentication. Authentication code pairs your game with the Gateway extension. Streamers will need a place to enter the PIN from the Extension Configuration to successfully authenticate. It's common to make a "Gateway Authentication" tab in the options menu that has a text input for the PIN.
Authentication code usually looks something like:
C#
private SDK.OnAuthenticateDelegate AuthCB;


void SetupCallbacks()
{
    AuthCB = (Response) =>
    {
        if (Response.HasError)
        {
            PlayerPrefs.SetString("RefreshToken", "");
            return;
        }


        PlayerPrefs.SetString("RefreshToken", Response.RefreshToken);

        // It's common to setup and register things here when an auth is successful
        // We will go over what these functions do in a moment
        SDK.OnActionUsed(ActionCB);
        SetGameMetadata();
    };
}


void CheckForRefreshToken()
{
    String RefreshToken = PlayerPrefs.GetString("RefreshToken", "");
    if (RefreshToken != "")
    {
        SDK.AuthenticateWithRefreshToken(RefreshToken, AuthCB);
    }
}


void Authenticate(String PIN)
{
    SDK.AuthenticateWithPIN(PIN, AuthCB);
}


void Start()
{
    // ...
    SetupCallbacks();
    CheckForRefreshToken();
}
The first authentication the streamer performs will need to be with a PIN, so you would just call Authenticate(PIN) for the first authentication attempt.
If a streamer successfully authenticates with a PIN, a refresh token will be given inside the authentication callback that can be stored for later use.
The refresh token allows the streamer to authenticate without needing to enter a PIN every time.
We call SDK.OnActionUsed(ActionCB) which simply registers a callback with the SDK for when an action is used. There are other .On_ methods (like SDK.OnBitsUsed(BitsCB) for example) that you can register if you need those features.
We also call SetGameMetadata()which sets our games metadata (we will cover this in the next section).
Once authentication is completed all the features of Gateway become available.
Game Metadata
You will want to set the metadata for your game. This means setting your game's name, logo, and theme for the front-end extension to use.
SetGameMetadata is the function we called in the success block of the AuthCB in the previous Authentication section.
Your Texture2D Game Logo format should be RGB24 or RGBA32. You can set the format on the Texture2Ds import settings. You can also set this when saving from Adobe programs by checking Image<Mode (Photoshop) or File<Document Color Mode (Illustrator). Maximum image size for the Game Logo is 50 px height and with width being automatically adjusted; images larger than this will be automatically scaled down. Save out your logo as a png under 500kb.
The Meta.Name should be the name of your game or can describe your Gateway extension. The Meta.Name has a character limit of 40.
C#
void SetGameMetadata()
{
    Texture2D GameLogo = Resources.Load<Texture2D>("Textures/Gateway/MyGameLogo.png");

    GameMetadata Meta = new();
    Meta.Name = "My awesome game!";
    Meta.Logo = SDK.ConvertTextureToImage(GameLogo); // base64 encoded image
    Meta.Theme = ""; // empty for default theme
    SDK.SetGameMetadata(Meta);
}
This is the result you should see in the extension at the top from calling SetGameMetadata. Your game's logo should appear in the top left, and the name in the top right.

Want to sign up for Muxy Gateway? Sign Up Here
See the entire Muxy Gateway docs here: https://docs.muxy.io/docs/unity-gateway-tutorial
Need Help or Having Issues? Join Our Support Discord
Enjoy the gratifying pleasure of slicing in Slice Master a game that aims to provide both challenge and leisure. Smoothly slide your blade through items, timing your strokes to get points and make clean cuts.